- Go to calendar.google.com and sign into your Beloit account.
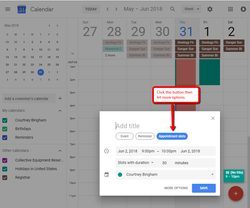
- Click on the calendar background for the date and start time that you want to create your event.
- In the event pop-up box, select Appointment slots.
- Click on the Add Title field, and then fill in a title for the calendar event.
- Click on the More Options link to go to the Event Details screen.
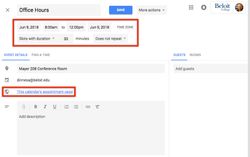
- Fill in the details of your appointment. A few options to consider:
- Start and End Times - events default to one hour, but can be extended as needed
- Start and End Dates - can be set to one day, or a range of dates for recurring appointments.
- Appointment Duration - set the default time duration for appointments.
- Repeat Event - set a repeat for recurring office hours or appointment availability.
- Copy the This Calendar's Appointment Page link. This link can be:
- Sent to the individuals or groups that you would like to book appointments.
- Shared via a webpage, doc, or email signature.
- After you have all of the details setup, click the blue Save button.
- Your appointment slots will now be available for users to self-select and book.
Note: Once you have setup appointment slots and shared the link, users can Request Appointments, and then you will need to Manage Appointment Requests.

