Forwarding Email
Adam Dinnes
Twyla Rivalee Barkakoty (Unlicensed)
Courtney Bingham (Unlicensed)
Overview
Gmail allows users to forward mail to other email accounts. Follow the instructions below to setup forwarding addresses and create filter rules for forwarding.

Adding Forwarding Accounts
- Go to mail.google.com and sign into your Beloit account.
- Click the Settings icon located on the right side of the screen below your Google account picture. Then select Settings.
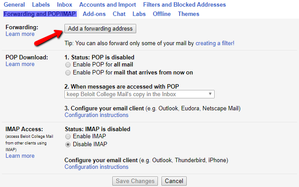
- Once you are in settings, click on the blue Forwarding and POP/IMAP tab.
- Select Add a Forwarding address. Then type in the email address that you would like to forward your emails to.
- After you are finished, click next. Then click proceed in the confirmation window that will pop up after.
- If the forwarding address is from outside the Beloit College organization, a confirmation code will be sent to the assigned email address to verify permission. To verify the forwarding account:
- Retrieve the confirmation code from the other email account.
- Enter the confirmation code into the Verification field in the Forwarding menu.
- Click the Save Changes button at the bottom of the page.

Forwarding to One Account
Gmail gives you the opportunity to forward future emails you receive over to another email address. This feature is good to use if you are transitioning between email addresses. Follow these instructions to learn how to forward emails.
- Go to the Forwarding menu and select the new Forwarding Address.
- Select one of the Action setting for message handling in your inbox.
- Keep Beloit College Mail's copy in the Inbox.
- Mark Beloit College Mail's copy as read.
- Archive Beloit College Mail's copy
- Delete Beloit College Mail's copy.
- Click Save Changes at the bottom of the Settings page.
Note: You can disable forwarding and/or remove forwarding addresses whenever you would like. See below for more information.

Forwarding to Multiple Accounts
To forward your emails to multiple accounts follow the steps given below.
- Follow the steps given above on Adding Forwarding Accounts.
- Repeat the procedure until you have added all the email addresses you would like to forward your messages to.
- Now go to Settings.
- Click on the Filters and Blocked Addresses tab.
- Click on Create a new filter.
- In the Filter pop-up menu, fill in the parameters for the forwarding filter.
- For more information on filters, visit the Filtering Messages article.
- Click on Create filter with this search link.
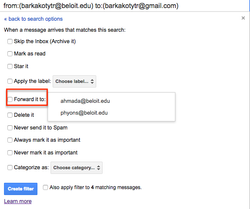
- Locate the checkbox titled Forward it to.
- From the Forwarding address drop-down menu, choose the address to which you would like to forward the emails to.
- Review and select any other desired action settings for the filter.
- Click on Create Filter.
- Your filter will now be in affect and you will be redirected to Filters and Blocked Addresses menu.
- Repeat steps 6. through 12. until you have all the email addresses to which you would like to forward the emails to.
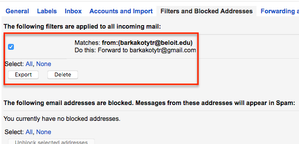
| Filters and Blocked Addresses |
|
| Forward emails- drop-down menu |
 |
Disable Forwarding
Follow the steps given below to disable forwarding emails to the formerly assigned account(s).
- Go to mail.google.com and sign into your Beloit account.
- Go to the Settings menu.
- Click on the Forwarding and POP/ IMAP tab.
- Check the box against Disable forwarding.
- Click Save Changes located at the bottom of the screen.
Your messages will not be forwarded to another account(s) anymore.

Remove a Forwarding Account
To remove an account from receiving the forwarded emails follow the steps given below.
- Go to mail.google.com and sign into your Beloit account.
- Go to the Settings menu.
- Click on the Filters and Blocked Addresses tab.
- Check the box against the filter that says Forward to: email address.
- If you want to remove multiple filters check the applicable boxes.
- Click on Delete.
- In the Confirm filter deletion pop-up click OK.
- Now go to the Forwarding and POP/ IMAP tab.
- Locate the section titled Forward a copy of incoming mail to.
- From the drop-down menu select Remove( the email address which you would like to remove).
- Click OK on the Confirm active forward address removal pop-up.
- Changes will be automatically saved.
- From the drop-down menu select Remove( the email address which you would like to remove).
- Repeat step 7. until you have removed all the desired email addresses.
The email addresses will be removed from you forwarding list.

