Transfer Mail Between Google Accounts
Adam Dinnes
Twyla Rivalee Barkakoty (Unlicensed)
Warning
If your college account was recently restored after September 1st, you may need to wait 24 hours before attempting to retrieve email via POP.
Beloit College offers (@alumni.beloit.edu) Google email addresses to all alumni. Graduated student email accounts will be closed September 1st. Alumni who are new to using Google mail or new alumni who are switching to an alumni Google account from their student Google account can use the following instructions to move data associated with their email account.Transferring mail from one Google account to another is a two-step process as illustrated below.
First step, change the settings in your original account.
- Login to the Gmail account from which you want to import mail.
- Click on the Settings (gear) icon located at the top right of the screen.
- Again click Settings on the drop-down menu.
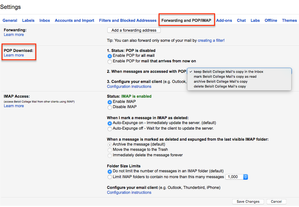
- Select the Forwarding and POP/IMAP tab.
- Locate the section, POP Download.
- Select Enable POP for all mail.
- In the drop-down menu of the section, When messages are accessed with POP, choose an action for the messages in this account. There are four options:
- keep Gmail's copy in the inbox
- mark Gmail's copy as read
- archive Gmail's copy
- delete Gmail's copy
- Click Save Changes at the bottom of the page.
- Login to the Gmail account to which you would like to import mail.
- Click on the Settings (gear) icon located at the top right of the screen.
- Again click Settings on the drop-down menu.
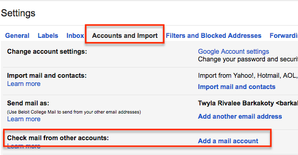
- Select the Accounts and Import tab.
- Click Add a mail account in the section- Check mail from other accounts.
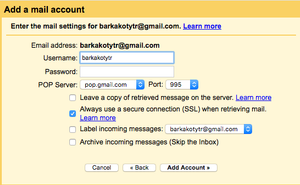
- A pop-up will appear.Enter the full email address of the original account, then click Next Step.
- Add a mail account menu will appear.
- Enter your username (if necessary, the entire @beloit.edu), password, POP Server = pop.gmail.com, Port = 995.
Note: If you use 2-Step Verification, you will need to enter a new app password.
6. Click Save Changes.
You will now be able to receive and access mail from the original account in the newly assigned account.
| Forwarding and POP/IMAP settings- Original Account |
|
| Accounts and Import settings |
 |
| Add a mail account menu |
 |
