Call Controls in Hangouts Meet
Adam Dinnes
Overview
Google Hangouts Meet conference calls are controlled using the Call Controls menu that appears at the bottom of each video call session. Detailed information on the Call Controls is offered below:


Microphone
The Microphone button toggles Mute/Unmute states for the active microphone. The microphone icon will have a WHITE background when the microphone is Active/Unmuted (active), and a Red background when it is Muted.


Leave Call
The Leave Call (Hang-up) button disconnects the call, deactivating the webcam and microphone in the process.

Webcam
The Webcam button toggles between Share/Hide states for the active webcam. The webcam icon will have a White background when the webcam is Active/Shared, and a Red background when it is Hidden.
Note: If you hide your webcam (deactivate video) Hangouts Meet will instead show your account profile picture. Audio will continue to function as normal with the webcam hidden.


Captions
The Captions button toggles closed captions on/off for the video call. The captioning icon will have Black text when captioning is inactive, and Green text when it is active. This is a per user setting, so you can only toggle the setting for your individual screen. Turning captions on will leverage the Google voice recognition to attempt voice to text recognition. Captions will appear in the lower left corner of the video window.
Note: The quality of the audio from individual participants has a direct bearing on how accurate the captioning will appear. See our Tips for a Successful Video Call guide for strategies on improving call quality, and thus the accuracy of captioning.


Present
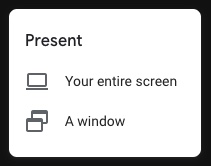
The Present Now button enables screen sharing from the the host computer. Clicking the Present Now button will open the Present popup menu, allowing you to select whether to share Your Entire Screen, or just a specific Application Window. For more information on this function, see the full article on Sharing Your Screen in Google Hangouts Meet.


More Options
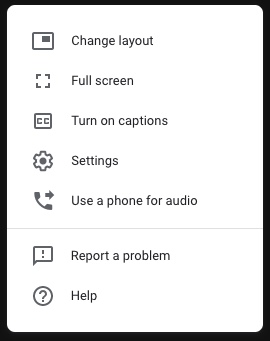
The More Options button opens a popup menu with additional call controls and settings. Below is a list of the additional controls:
- Change Layout - provides a popup menu with different layout options for the Hangouts Meet window.
- Full Screen - resizes the Hangouts Meet call window to occupy the entire screen, hiding browser window. Hit ESC to exit full screen mode.
- Turn On Captions - a duplication of the Captions button in the Call Controls. See the Captions section above for functionality details.
- Settings - provides granular options for modifying call quality settings. See the Settings section below for more details.
- Use a Phone for Audio - allows you to provide your direct dial phone number for meeting participants, or provides a call-in number and access code to join the meeting via a phone conference bridge from a touchtone, cellular, or wifi phone.
- Report a Problem - allows you to report problems or share ideas for improving Hangouts Meet directly with Google.
- Help - links to the Google Hangouts Meet Help Center.


Settings
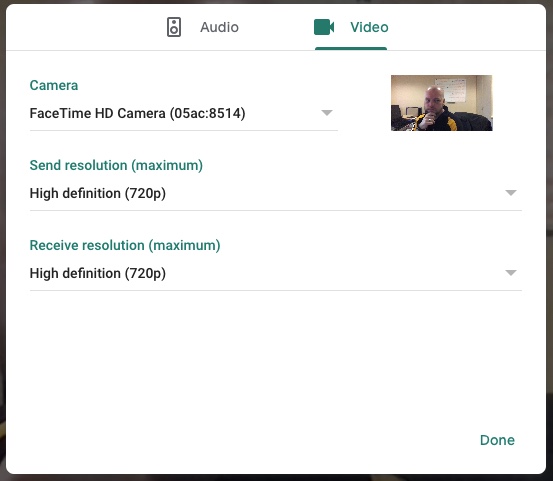
Selecting Settings from the More Options menu launches a pop-up menu that allows you to select different audio or video input devices and adjust audio/video quality settings within the call. Hangouts Meet automatically selects the internal webcam and microphone of the device, if it has one. If you would like to use a higher quality external device, such as a USB webcam or microphone, you will need to go to the Settings menu to select the device once it is plugged in to the computer. The Settings menu is split into Audio and Video tabs for easy navigation.
- Audio - allows you to select the Microphone input and the Speaker output (including output to wired or wireless headphones). Different input/output sources can be selected from the dropdown menus. This menu also provides a pickup waveform to test the microphone and allows you to play a test tone to verify operation of the selected speakers/headphones. For more information, visit the full articles on Using an External Microphone in Hangouts Meet and Using External Speakers of Headphones in Hangouts Meet.
- Video - allows you to select your video source and also has settings for adjusting audio and video quality.
- Webcam - allows you to select from the internal webcam or an external webcam. The preview window to the right of the dropdown shows live video from the currently selected webcam. For more information, visit the full article on Using an External Webcam in Hangouts Meet.
- Send Resolution - allows you to adjust the maximum quality of the video from your webcam out to other callers. Options will be limited by the capabilities of the webcam that you have selected and can range from 360p (low quality, standard definition video) up to 720p (minimum HD). Hangouts Meet currently limits video quality to 720p, even for webcams capable of 1080p or higher resolutions, in order to limit call bandwidth and provide a good call experience for all callers.
- Receive Resolution - allows you to adjust the maximum quality of the video you receive from other callers, regardless of the setting they've enabled on their end of the call. Also allows you to disable video from all callers and switch to Audio Only.
- Notes about send/receive resolution - Hangouts Meet attempts to dynamically adjust the quality for individual users on the call to maintain the best quality possible, but as network conditions can change, especially over the course of longer calls, you may want to adjust some of the quality settings manually to for more consistent performance and quality. Be aware that decreasing the video quality will increase the compression of the audio and video, which can introduce audio distortion, video artifacts (pixilation), and lower the video frame rate to a level that may not be viewable/legible. LITS recommends only adjusting these quality settings if you are experiencing significant problems with a call. See our article on Tips for a Successful Video Call for other strategies on improving call quality.
If do you need to make any changes to input/output devices or video quality settings:
- Select the desired input and output devices, testing as necessary.
- Click the green Done button to save the configuration changes and return to the call.

