Connect to a network drive
| Info | ||
|---|---|---|
| ||
If your laptop is currently enrolled in Jamf, you will not need to follow the below steps. Your shared drives should automatically connect whenever you are on campus or connected to the College VPN. If you are connected and are enrolled in Jamf but still don't see the shared drives, please submit a SchoolDude ticket. |
Follow the steps given below to connect an Apple computer to a network drive.
Click on the Desktop to display Finder in the upper left hand corner.
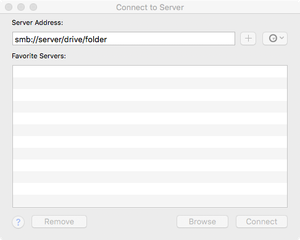
Move across the menu bar to Go and drag down to Connect to Server
In the Connect to Server window click on the bar under Server Address
Enter the address for the connection in the following format
Then click the Connect button.
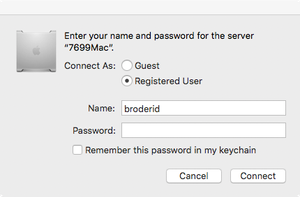
A window will then display asking to to enter your credentials
Enter your userid and password.
Note: If this is to be a regular connection check the Remember this password box
The drive will then mount to your desktop.
If you go back through steps 1. and 2. you can click on the + sign next to the server address and that will save the address to the Favorite Servers pane
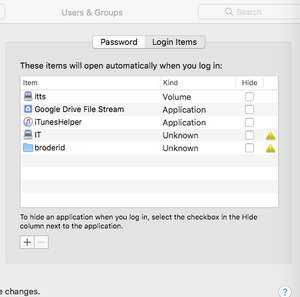
Follow the steps given below if you wish to connect each time you start your computer on campus,
- Click to open System Preferences
- Click on Users & Groups
- Click on the Login Items tab
- Click and drag the drive icon(s) from the desktop to the Users & Groups right hand pane
- You will now automatically connect to the drive(s) upon starting your Mac while on campus
If you bring your laptop onto campus while it is running, you will need to first connect to the campus network, then you will be able to connect to your network drives using the instruction on how to Connect to a network drive
If you want to connect to the drives while at home or on the road you will need to have the campus VPN software installed, follow the steps given below
- Start up Tunnelblick, found in the Applications folder
- Then click on the Tunnelblick icon on the menu bar and drag down to Connect Client
- Enter your credentials when requested.
- Once the connection is made use the steps above to connect to the network drive
| Connecting to Server |
|
| Enter Username and Password |
|
| Automatic connection |
 |
Displaying Network Drive on Desktop
Follow the steps given below to see if a network drive will be display on your desktop:
- Click on Finder in the upper left hand corner
- Click on Preferences to open the Finder preference
- Click the on General tab, and check the Connected servers box
