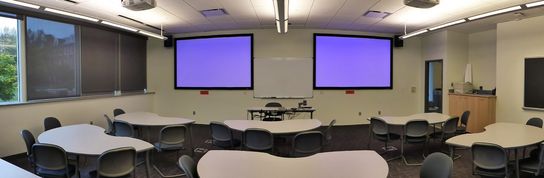
The SC 116 classroom is a Computer Science department lab and teaching space located on the first floor of the Sanger Center for the Sciences. Instructional technology in this space includes dual projectors and stationary cinema HD screens, along with an HD document camera and both VGA and a matrix switcher with multiple HDMI connections for laptops or other HD devices.
Contents
The information on the following pages documents how to connect and utilize the equipment in common configurations as well as basic troubleshooting steps.
| Table of Contents | ||||
|---|---|---|---|---|
|

Capacity | 24 | |
|---|---|---|
Furniture | Table (instructor), semicircle tables with chairs, 4’ whiteboard (front), 10’ chalkboard (side). | |
Technology | Ceiling-mounted data/video projector x2, wall-mounted projection screen x2, wall-mounted speakers, instructor's table with document camera and connections for laptop and audio. | Software|
Special Notes: |
|


QUICK START GUIDE
The instructions on this page contain the essential directions to connect and display from available sources. For more detailed directions with photos and annotations, please consult the expanded documentation on the following pages.
Project from a single laptop to both projectors using HDMI
Press the ON button on both of the wall-mounted A/V Control Panels.
Once the projector displays comes up, then press the HDMI button on each A/V Control Panel.
Connect the HDMI 3 cable located on the left side of the instructor’s table to the HDMI port on your laptop or mobile device.
On the HDMI Matrix Switcher, press both Input Select buttons until the 3 LED is lit.
Use the volume knob on the Stage Left A/V Control Panel as needed to adjust the audio level.
Project from two laptops using HDMI
Press the ON button on both of the wall-mounted A/V Control Panels.
Once the projector displays comes up, then press the HDMI button on each A/V Control Panel.
Connect the HDMI 3 Laptop cable on the left side of the instructor’s table to the HDMI port on the first laptop.
Connect the HDMI 4 Aux cable on the right side of the instructor’s table to the HDMI port on the second laptop.
On the HDMI Matrix Switcher, press the Input Select button until the 3 LED is lit for one laptop, and then press the second Input Select button until the 4 LED is lit for the second laptop.
Use the volume knob on the Stage Left A/V Control Panel as needed to adjust the audio level.
Audio is only available from the first laptop.
Project from the document camera to both projectors
Press the ON button on both of the A/V Control Panels.
Once the projector display comes up, press the HDMI button on each A/V Control Panel.
On the HDMI Matrix Switcher, press the both Input Select buttons until the 2 LED is lit for each projector.
Press the ON button on the base of the WolfVision document camera.
Project from a laptop and the document camera
Press the ON button on both of the A/V Control Panels.
Once the projector display comes up, press the HDMI button on each A/V Control Panel.
Connect the HDMI 2 cable on the left side of the instructor’s table to the HDMI port on the laptop.
Press the ON button on the base of the WolfVision document camera.
On the HDMI Matrix Switcher, press the Input Select button until the 2 LED is lit to display the document camera on one projector.
On the HDMI Matrix Switcher, press the Input Select button until the 3 LED is lit to display the laptop on the other projector.
Use the volume knob on the Stage Left A/V Control Panel as needed to adjust the audio level.
Project from a single laptop to both projectors using VGA
Press the ON button on both of the wall A/V Control Panels to activate the system.
Once the projector display comes up, then press the LAPTOP button on each A/V Control Panel.
Connect the laptop VGA cable on the right side of the instructor’s table to the VGA port on your laptop.
Connect the 3.5mm Audio cable to the Headphone port on your laptop.
Use the volume knob on the Stage Left A/V Control Panel as needed to adjust the audio level.
ROOM READINESS STANDARD
The information below details how to shutdown shut down the a/v equipment and return the room to ready condition for classes.
When you are finished using the a/v equipment:
If external devices (laptop or video player) were used, please detach the cables and return them to the cable manager or cable hook.
Press the Display OFF button on both of the Extron A/V Control Panels.
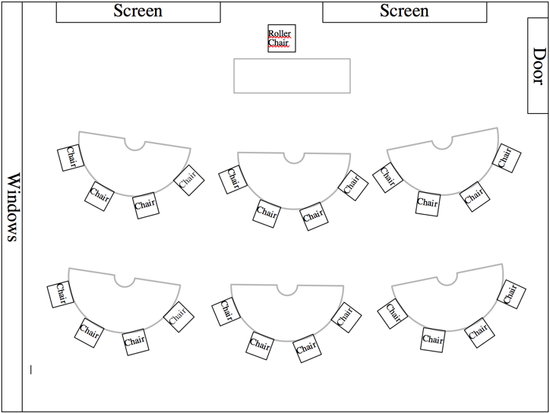
If any of the student tables and chairs have been moved, please return them to their proper location, based upon on the room layout below.
Standard room layout
IMPORTANT NOTES
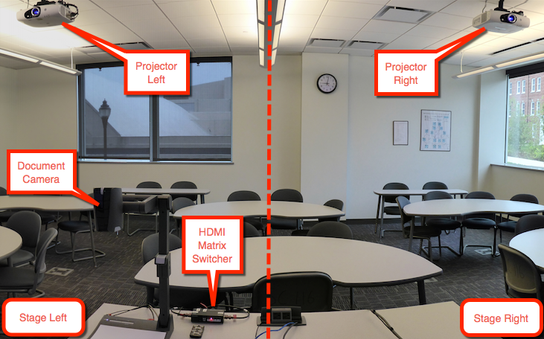
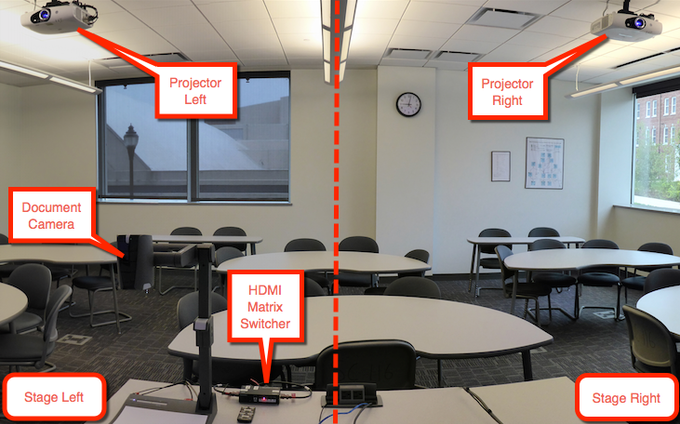
The instructions on the following pages use stage directions when referring to the equipment on the different sides of the room. See the annotated photos below for more information.
Mac laptops, mobile devices and newer PCs may require a display adapter to connect to the projector via HDMI or VGA.
The Stage Left projector is the only projector that has audio capabilities. This projector must be receiving an active video signal for audio to function within the room. Audio volume control can only be managed at the Stage Left A/V Control Panel.
The Da-Lite projection screens at the front of the room have a matte cinema projection surface. The projection surface material is very sensitive. Do not touch or write on the screens as it will damage the projection surface.
The display platform on the Wolfvision document camera should not be used as a writing surface. Even erasable whiteboard markers could irreparably harm the surface. Please use paper with the doc cam if you need to write, or utilize the wall-mounted whiteboard.
The HDMI matrix switcher is secured to the table next to the document camera. Please do not bypass or remove either of these devices or change and of the cables configured into each device.
Many cables in this room have been tagged with color-coded printed labels (red, green, silver).
Red and Green labeled ends plug into components or ports in the system.
Red cable ends should never be unplugged as the system requires them to be in a specific configuration to function properly. Many of these cables have been hot-glued into place to ensure that they remain in the proper configuration. Please do not unplug these cables.
Green cable ends can be unplugged and used for other devices if needed. These should be returned to their home location, identified with printed labels on the desk, after each use.
Silver cable ends are the ones commonly used to connect instructional devices (laptops, Blu-Ray players, etc.). These should be returned to their home location (labeled hook or cable retainer/holder) after each use.
Student view

EQUIPMENT SETUP SCENARIOS/PROCESS
Project from a single laptop to both projectors using HDMI
Press the ON button on both of the wall-mounted A/V Control Panels.
Once the projector displays comes up, then press the HDMI button on each A/V Control Panel.
Connect the HDMI 3 cable located at the rear of the instructor’s table to the HDMI port on your laptop or mobile device.
On the HDMI Matrix Switcher, press the both Input Select buttons until the 3 LED is lit.
Use the volume knob on the Stage Left A/V Control Panel as needed to adjust the audio level.
For best quality audio, make sure that the sound on your laptop is turned up to max.
Note that audio is only available when using the Stage Left projector.
When you are finished using the equipment, please power down all components.
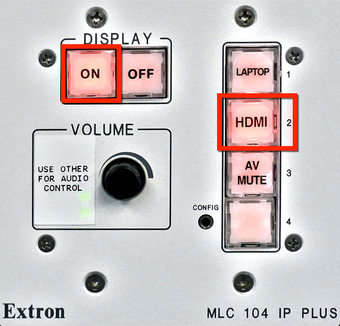
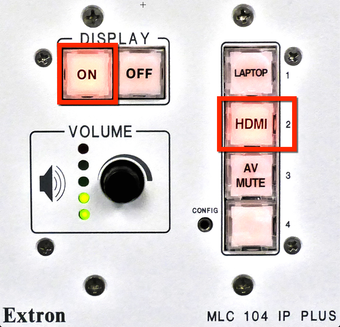
Stage Left A/V Control Panel
Project from two laptops using HDMI
Press the ON button on both of the wall-mounted A/V Control Panels.
Once the projector displays comes up, then press the HDMI button on each A/V Control Panel.
Connect the HDMI 2 cable on the left side of the instructor’s table to the HDMI port on the first laptop.
Connect the HDMI 3 cable on the right side of the instructor’s table to the HDMI port on the second laptop.
On the HDMI Matrix Switcher, press the Input Select button until the 3 LED is lit for one laptop, and then press the second both Input Select button until the 4 LED is litfor the second laptop.
This setup would place the first laptop on the left screen and the second on the right screen. This can be flipped by selecting Aux 4 for the first laptop and Laptop 3 for the second.
Use the volume knob on the Stage Left A/V Control Panel as needed to adjust the audio level.
For best quality audio, make sure that the sound on your laptop is turned up to max.
Note that audio is only available when using the Stage Left projector.
When you are finished using the equipment, please power down all components.
Stage Right A/V Control Panel
Stage Left A/V Control Panel
Project from the document camera to both projectors
Note: Never write directly on the document camera projection surface. Please see Special Notes for more details and alternatives.
Press the ON button on both of the A/V Control Panels.
Once the projector display comes up, press the HDMI button on each A/V Control Panel.
On the HDMI Matrix Switcher, press both Input Select buttons until the 2 LED is lit for each projector.
Press the ON button on the base of the WolfVision document camera.
Green LED = ON
White LED = OFF
To the right of the power button is the light control for the document table.
Camera zoom level can be controlled by the large Zoom Wheel on the top of the camera head.
Many other functions for the document camera can be controlled from the menu buttons on the front of the camera head.
Note: For more detailed information on the functions of the WolfVision VZ-8light4 HD desktop visualizer, please consult the online User Manual for the VZ-8light4 [PDF].


Project from a laptop and the document camera
Press the ON button on both of the A/V Control Panels.
Once the projector display comes up, press the HDMI button on each A/V Control Panel.
Connect the HDMI 3 cable on the left side of the instructor’s table to the HDMI port on the laptop.
Press the ON button on the base of the WolfVision document camera.
Green LED = ON
White LED = OFF
On the HDMI Matrix Switcher, press one Input Select buttons button until the 2 LED is litto lit to display the document camera on one projector.
On the HDMI Matrix Switcher, press the second Input Select button until the 3 LED is litto display the laptop on the other projector.
Additional information about the document camera controls can be found on page 8 of this guide.
Use the volume knob on the Stage Left A/V Control Panel as needed to adjust the audio level.
For best quality audio, make sure that the sound on your laptop is turned up to max.
Note that audio is only available when using the Stage Left projector.
When you are finished using the equipment, please power down all components.
Stage Right A/V Control Panel
Stage Left A/V Control Panel
Project from a single laptop to both projectors using VGA
Note: HDMI is the preferred connection method since it will provide superior digital projection quality. If your device supports HDMI, we recommend using that connection over VGA.
Press the ON button on both of the wall A/V Control Panels to activate the system.
Once the projector display comes up, then press the LAPTOP button on each A/V Control Panel.
Connect the laptop VGA cable on the right side of the instructor’s table to the VGA port on your laptop.
Connect the 3.5mm audio cable to the Headphone port on your laptop.
Use the volume knob on the Stage Left A/V Control Panel as needed to adjust the audio level.
For best quality audio, make sure that the sound on your laptop is turned up to max.
Note that audio is only available when using the Stage Left projector.
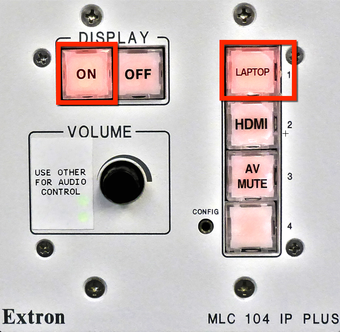
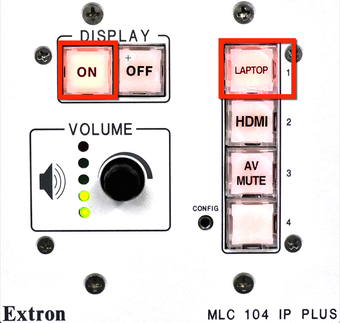
Stage Left AV Control Panel - VGA
TROUBLESHOOTING
The directions below guide you through basic troubleshooting steps for potential problems with the audio-visual technology in this classroom. Please DO NOT unplug any system cables. If the steps below do not resolve your problem, please contact LITS Support for further assistance.
Cables Unplugged
If you arrive in the room and some of the cabling has been unplugged:
Many cables in this room have been tagged with color-coded printed labels (red, green, silver).
Red and Green labeled ends plug into components or ports in the system.
Red cable ends should never be unplugged as the system requires them to be in specific places to operate properly.
Green cable ends can be unplugged and used for other devices if needed. These should be returned to their home location (printed on the label) after each use.
Silver cable ends are the ones commonly used to connect instructional devices (laptops, Blu-Ray players, etc.). These should be returned to their home location (hook or cable retainer/holder) after each use.
Many of the Red labeled cables have been hot glued into the proper ports to ensure that the room remains in the proper configuration.
Following the color-coded label scheme above, cables can be easily be returned to the proper configuration if they are disconnected. Simply plug the cables back into the corresponding ports.
If you are unable to get cables plugged back in or if display problems persist, please contact LITS Support for further assistance.
No Audio - 3.5mm
If you are not getting any audio from the system when using 3.5mm audio, please try the following:
Make sure that you are sending to the Stage Left projector.
Check that the volume is turned up on the Stage Left A/V Control Panel. The LEDs on the panel indicate the current volume level.
Make sure that the sound on your laptop and the program is turned up to max.
Make sure that the 3.5mm audio cable is fully seated in the headphone port.
Some laptops use the same port for both sound input and sound output. Make sure that the sound card on your laptop is set to output.
Mac laptop
Go to Apple > System Preferences > Sound > Output and select Headphones.
Windows laptop
Go to Start > Control Panel > Sound > Playback and select Headphones.
Note that your Windows laptop may have a sound card that uses third-party software to manage audio connections. You may need to make the change in that software instead of Control Panel.
If the problem persists, please contact LITS Support.
No Audio - HDMI
If you are not getting any audio from the system when using HDMI, please try the following:
Make sure that you are sending to the Stage Left projector.
Check that the volume is turned up on the Stage Left A/V Control Panel. The LEDs on the panel indicate the current volume level.
Make sure that the matrix switcher is sending to the Stage Left screen.
Make sure that the sound on your laptop and the program is turned up to max.
Make sure that the HDMI cable is fully seated in the HDMI port (or display adapter).
Make sure that the sound card on your laptop is set to output over HDMI (instead of the headphone 3.5mm output port).
Mac laptop
Go to Apple > System Preferences > Sound > Output and select HDMI.
Windows laptop
Go to Start > Control Panel > Sound > Playback and select HDMI.
Note that your Windows laptop may have a sound card that uses third-party software to manage audio connections. You may need to make the change in that software instead of Control Panel.
While the system supports HDMI audio transport, not all laptop ports are capable of supporting audio transport. If you have an older laptop, you may need to utilize the 3.5mm audio cable to send audio to the system speakers.
If the problem persists, please contact LITS Support.
No Projection - HDMI
If you are getting a blank screen from the projector when you have your laptop plugged in via one of the HDMI cables, then please check the following:
Make sure that you have selected the HDMI source on each of the Extron wall control panels and on the HDMI matrix switcher remote.
Check to see if the input LED lights on the top of the matrix switcher are lit. If not, skip to the No Projection - HDMI Matrix Switcher troubleshooting section below.
Remove the HDMI cable (or display adapter cable) from the laptop HDMI port and then re-insert it, making sure that the cable is properly seated.
Make sure that your laptop is set to Mirror/Duplicate display.
Mac laptop
Go to Apple > System Preferences > Displays > Arrangement.
Your Mac will only display the Arrangement tab if it is picking up an external display. If it is not, try re-seating the display cable again.
Click on the Mirror Displays checkbox on the lower left side of the window.
Windows laptop
Press the Windows button + P to bring up the Projection Menu.
Use the Arrow keys to highlight Duplicate and press Enter to select.
If still not displaying, right-click on the desktop background.
Click on Screen Resolution.
If no secondary display is listed:
Try re-seating the display cable.
Click the Detect button.
If the problem persists, please contact LITS Support.
No Projection - VGA
If you are getting a blank screen from the projector when you have your laptop plugged via the VGA cable, then please check the following:
Note: HDMI is the preferred connection method since it is more reliable and will provide superior projection quality. If your device supports HDMI, we recommend using that connection option over VGA.
Make sure that you have selected the VGA source on each of the Extron wall control panels.
Remove the VGA cable (or display adapter cable) from the laptop HDMI port and then re-insert it, making sure that the cable is properly seated.Make sure that your laptop is set to Mirror/Duplicate display.
Mac laptop
Go to Apple > System Preferences > Displays > Arrangement.
Your Mac will only display the Arrangement tab if it is picking up an external display. If it is not, try re-seating the display cable again.
Click on the Mirror Displays checkbox on the lower left side of the window.
Windows laptop
Press the Windows button + P key to bring up the Projection Menu.
Use the Arrow keys to highlight Duplicate and press Enter to select.
If still not displaying, right-click on the desktop background.
Click on Screen Resolution.
If no secondary display is listed:
Try re-seating the display cable again.
Click the Detect button.
If the problem persists, please contact LITS Support.
No Projection - HDMI Matrix Switcher
If you are getting a blank screen from the projector and/or the input LED lights are not lit on the top of the matrix switcher, then please check the following:
Make sure that you have selected the correct inputs for your device on the matrix switcher.
Remove the HDMI cable from the laptop HDMI port and then re-insert it, making sure that the cable is properly seated.
Check that the cord for the power adapter is plugged into the power strip on the left leg of the table.
Check that the cord is also plugged into the power port on the left side of the unit.
If both are plugged in and there is still no display, then the unit may need to be reset. To do so:
remove the power cord from the power port on the back of the unit
wait for 10 seconds for the switch to lose power
plug the power cord back in
wait for the unit to go through its bootup and self-check process
reselect the proper inputs
images should return to the screen
If the problem persists, please contact LITS Support.